%202.png)
Ultimate Guide to Closing Credits with Template – Everything You Need to Know!
In today’s digital content world, professional Closing Credits are no longer optional—they are essential. Whether you’re creating a short film, YouTube video, documentary, or corporate production, clean and structured Closing Credits with Template help your work look polished, trustworthy, and industry-ready.
Creators in the USA especially demand fast, customizable, and professional Closing Credits Templates in the USA that meet global video standards. This guide will help you understand everything—from formats to best practices—and how to create stunning credits easily.
What Are Closing Credits?
Closing Credits appear at the end of a video to acknowledge cast, crew, contributors, music, tools, and legal information. They serve both creative and legal purposes.
Why Closing Credits Matter:
- Give proper recognition
- Improve production credibility
- Fulfill copyright & licensing requirements
- Create a professional viewer experience
In the USA, professional end credits are considered an industry standard for films, YouTube channels, OTT content, and branded videos.
What Is a Closing Credits with a Template?
A Closing Credits with Template is a pre-designed structure that helps creators quickly generate professional credits without manual formatting.
Benefits of Using a Template:
- Saves time ⏱️
- Consistent layout
- Industry-approved structure
- No design or editing skills needed
Using a template ensures your video credit section looks clean, readable, and cinematic.
Why Choose a Closing Credits Template in the USA?
Creators in the USA often follow specific formatting styles used in:
- Hollywood productions
- YouTube monetization guidelines
- OTT platforms
- Film festivals
A Closing Credits Template in USA ensures:
- Global acceptance
- Proper legal credit placement
- Compatibility with international platforms
This is especially important if your content targets US viewers or platforms.
Difference Between Closing Credits & End Credits
Many creators ask if Closing Credits and end credits in the USA are the same.
In practice, both refer to the final video credit section of a production.
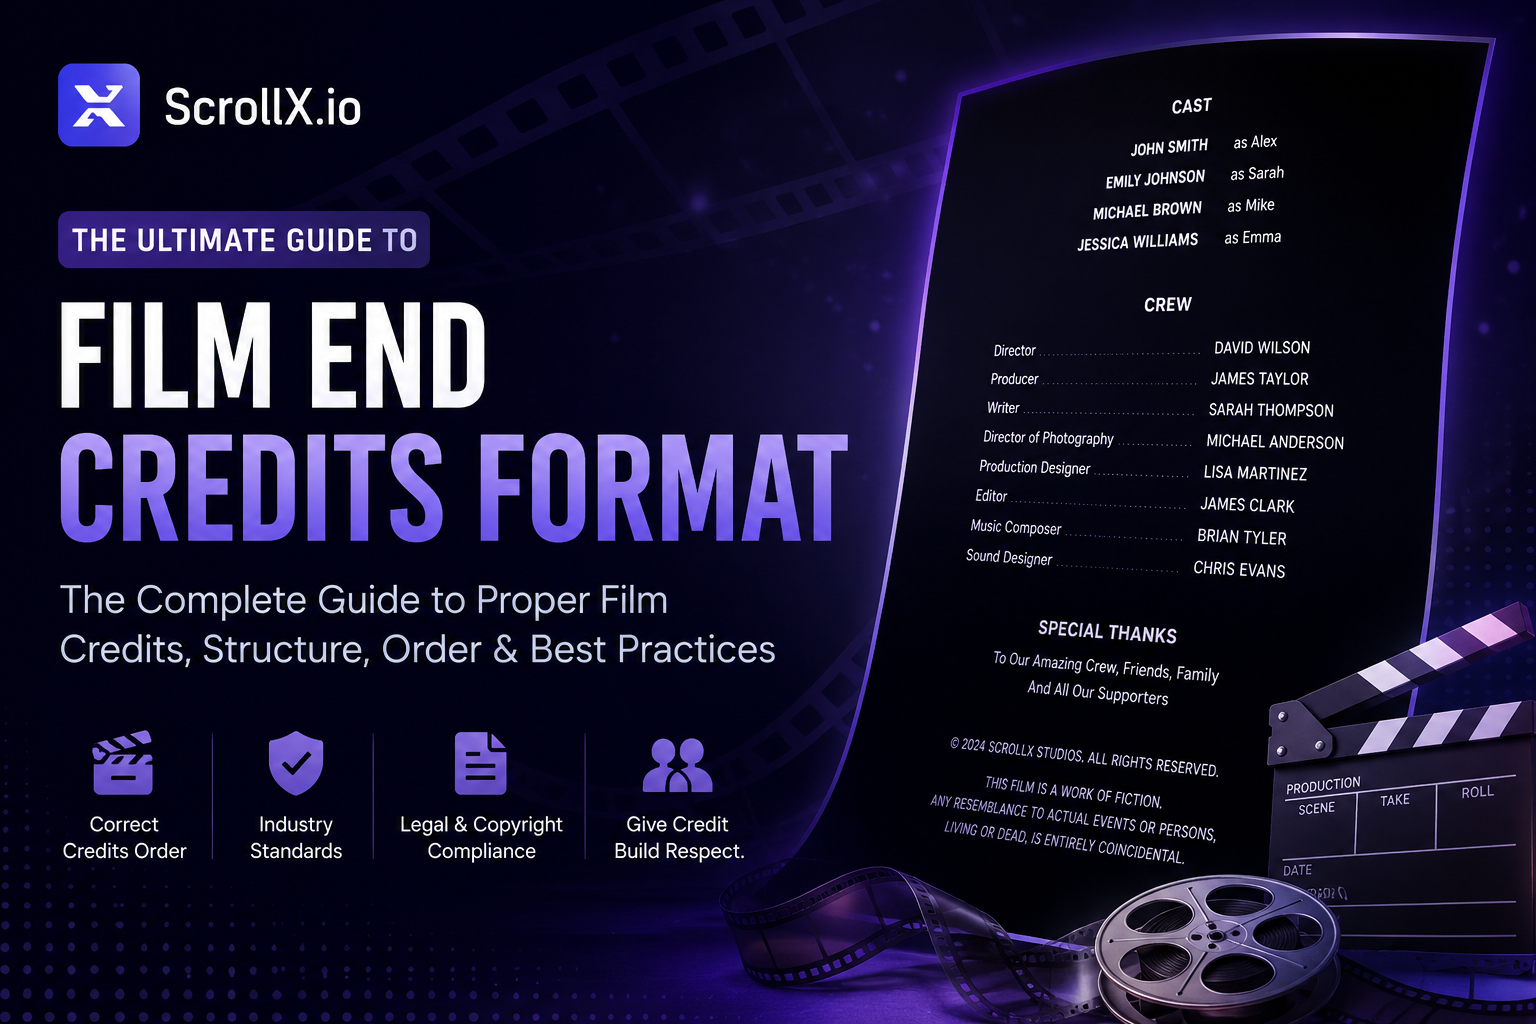
Essential Elements of Professional Closing Credits
To rank and convert well, your content must educate users properly. A perfect Closing Credits with Template should include:
- Production Title
- Cast Names
- Crew Roles
- Music & Sound Credits
- Special Thanks
- Legal Disclaimers
- Copyright Notice
These elements are commonly required in end credits in USA standards.
How to Create Closing Credits Easily (Step-by-Step)
Instead of complex editing software, modern creators use online tools.
Simple Process:
- Choose a Closing Credits Template
- Add cast & crew details
- Customize fonts & speed
- Preview the animation
- Export & use in your video
This approach is widely used by USA-based creators for fast turnaround.
Best Use Cases for Closing Credits Templates
A professional Closing Credits Template in USA is perfect for:
- 🎬 Short films
- 📺 YouTube videos
- 🎥 Documentaries
- 🧑💼 Corporate videos
- 🎮 Gaming content
No matter the format, proper video credit enhances trust and professionalism.
Common Mistakes to Avoid
Avoid these errors if you want higher rankings and better user experience:
- Overcrowded text
- Too fast scrolling
- Missing music credits
- Poor font contrast
- No copyright notice
Search engines also prefer content that educates users about such best practices.
Why Scrollx Is the Right Choice
Scrollx simplifies professional Closing Credits with Template creation for global users.
What Makes Scrollx Unique:
- Beginner-friendly interface
- USA-standard end credits formats
- No software installation
- Fast rendering
- Perfect for all video credit needs
This makes Scrollx an ideal solution for creators targeting the USA market.
Final Thoughts
If you want your videos to look professional, credible, and industry-ready, using a Closing Credits with Template is the smartest move. Especially for creators targeting the USA, a reliable Closing Credits Template in the USA ensures quality, compliance, and visual appeal.
.png)

.png)